
Heat Tape for Outside Pipes
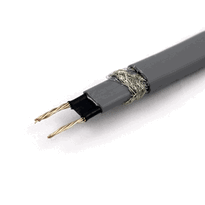
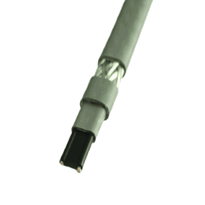
Heat tape for outside pipes helps prevent freezing by providing reliable, energy-efficient heating. There are self-regulating tapes that adjust their heat output based on ambient temperature, reducing the risk of overheating, and constant-wattage variants that deliver steady heat suitable for extremely cold conditions.
Proper installation is crucial for safety and effectiveness. Start by thoroughly cleaning the pipes to remove any dirt or debris. Measure the length of pipe accurately to ensure you select the correct length of heating tape. Secure the tape every six inches (15 centimeters) along the pipe, following the manufacturer's instructions, to ensure even heat distribution. Protect the connections with appropriate insulation material, which further aids in maintaining efficiency and safety.
Safety considerations are important when using heat tape. Always choose products that are UL-listed or certified by recognized safety organizations. Regular inspections of the tape and connections can help identify any wear or damage early. Adhere strictly to manufacturer instructions during installation and operation, and avoid modifying the tape or connections. Following these guidelines ensures your pipe heating system operates effectively and safely throughout the colder months.
Types and Features of Heat Tape for Outside Pipes
Understanding the different types and features of heat tape for outside pipes is essential for selecting the most effective and energy-efficient solution to prevent pipe freezing.
Self-regulating heat tapes adjust their heat output dynamically based on ambient temperatures. This feature enhances efficiency and safety by reducing the risk of overheating, making them ideal for varied outdoor conditions. These tapes respond to changes in temperature, increasing their heat output when it gets colder and reducing it as temperatures rise, which can lead to significant energy savings. This adaptability makes self-regulating heat tapes especially suitable for fluctuating weather conditions.
Constant-wattage heat tapes deliver a steady, unchanging level of heat. They're suitable for extremely cold conditions or long runs of pipe where consistent warmth is necessary. However, they tend to consume more energy compared to self-regulating options, making them less efficient over time.
Non-regulating tapes maintain a fixed output at all times. These are simpler to install but come with higher safety and energy concerns if misused. They can easily cause overheating, which poses risks to both safety and the longevity of the pipes.
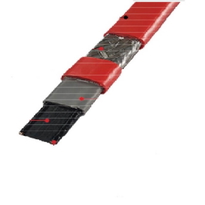
The construction materials of heat tapes vary for different applications. Silicone rubber tapes can tolerate temperatures up to 230°C (about 450°F), making them suitable for most outdoor use cases.
Fiberglass-insulated tapes can handle even higher temperatures, up to approximately 480°C (900°F), ideal for more demanding environments.
High-temperature woven fabric tapes can withstand temperatures up to about 760°C (1400°F), providing durability in heavy-duty applications.
Choosing the right material depends on the specific requirements of the installation, including the ambient conditions and the type of pipes being protected.
Proper selection of heat tape ensures both safety and efficiency, ultimately helping to prevent costly pipe repairs and damage during cold weather.
Installation Preparation and Best Practices
Proper installation preparation is essential to ensure the safe and effective operation of heat tapes on outdoor pipes. First, thoroughly clean the pipe surface to remove dirt, moisture, and debris, which can diminish heat transfer and damage the tape. Ensuring the surface is free of debris improves heat conduction, which helps maintain consistent pipe temperature. Inspect the pipe for corrosion or damage, repairing any issues to optimize efficiency. Confirm the pipe material’s compatibility with the heat tape type and ensure the pipe is dry before installation to prevent electrical hazards. In addition, verify measurements of pipe length and diameter for correct tape selection. When attaching the heat tape, lay it flat without overlaps, securing it every 600 millimeters or 6 inches with non-strapping materials such as PVC electrical tape. Proper placement and connection are vital to ensure consistency and safety. - Prioritise thorough surface cleaning and inspection. - Use correct measurement and placement techniques. - Ensure electrical and safety compliance. Proper insulation and sealing of penetrations can further prevent moisture ingress, which is especially important when working with vapor control layers (VCL) to maintain building integrity.
Safety Considerations When Using Heat Tape
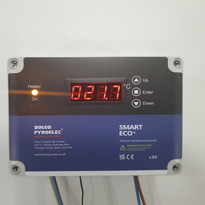
When using heat tape to prevent pipes from freezing outdoors, it's essential to follow strict safety guidelines to minimize fire hazards and electrical risks. This includes always using UL-listed and safety-certified products. Annual inspections are vital. Before winter sets in, typically in autumn, assess the condition of the heat tape and cables. Look for damage such as cracks, bare wires, or charring marks. Any signs of deterioration should result in immediate replacement to ensure safe operation. Proper selection of heat tape is equally important. Always choose products rated for the specific pipe diameter and length. Ensure that the heat tape is certified by recognized safety authorities and has three-prong grounding plugs. Connecting the system to GFCI protected outlets further reduces the risk of electrical faults. Installation must adhere closely to manufacturer instructions. This includes avoiding overlap of the heat tape and never covering it with insulation unless explicitly approved by the manufacturer. Such steps prevent overheating and potential fire hazards. Regular testing of the system is recommended. Always unplug the heat tape before conducting inspections or maintenance. Verify that the electrical connections and grounding are secure and intact to minimise the risk of faults. Ensuring proper insulation techniques around the heat tape can also prevent accidental damage and improve system efficiency. Taking these precautions helps protect property and loved ones during harsh weather conditions by ensuring the reliable and safe operation of heat tape systems.
Maintaining and Troubleshooting Your Heat Tape System
Regular maintenance and troubleshooting are vital to ensure that heat tape systems operate safely and effectively throughout the winter months. Consistent inspection of the tape for cracks, damaged insulation, or wiring issues helps prevent failures that could lead to frozen pipes or fire hazards. Inspecting the heating tape for tears or damage before and after each season is essential to identify potential hazards early. Cleaning the surface of the pipe and securing electrical connections with GFCI-protected outlets are important steps to maintain optimal performance. If problems do occur, it's essential to verify the power supply, check thermostats, and visually inspect the tape for any signs of damage or displacement. Utilizing waterproofing features in insulation can aid in protecting the system from moisture-related issues that may compromise safety or efficiency. To reduce the risk of issues, consider adopting the following practices:
- Conduct annual visual and physical inspections, addressing any wear or damage promptly.
- Follow the manufacturer’s instructions for secure attachment and insulation.
- Test the system regularly during cold spells, ensuring proper heat distribution and making adjustments to insulation as necessary.
Implementing these practices will help create a safe and reliable system, providing effective protection for your pipes against freezing during winter.
Conclusion
Proper selection, correct installation, and routine maintenance of heat tape ensure effective insulation of outside pipes, preventing freezing and subsequent damage. Adhering to safety guidelines minimises risk, while regular troubleshooting can identify system issues early.
By understanding the types and features of heat tape, users can make informed decisions that improve durability and performance. Implementing these best practices guarantees a reliable, efficient solution for protecting outdoor plumbing during cold weather conditions.