- Blogs
- Knauf Loft Insulation: Which is Best For Your Loft? A UK Guide
Knauf Loft Insulation: Which is Best For Your Loft? A UK Guide

TLDR (Too Long; Didn't Read)
Insulating your loft to the UK-recommended depth of 270mm with a product like Knauf Loft Roll is one of the most effective ways to reduce home heat loss and lower energy bills. Knauf's main products for lofts are Loft Roll 44 (a cost-effective, versatile choice) and Loft Roll 40 (offering slightly better thermal performance). Both are made from glass mineral wool with Knauf's unique ECOSE® Technology, which makes them softer and less irritating to handle than traditional mineral wool.
Installation is a manageable DIY task for many. The standard method involves laying a 100mm layer between the ceiling joists, followed by a 170mm (or thicker) layer laid at a right angle over the top of the joists. Safety is paramount: you must never cover recessed downlights or high-load electrical cables directly with insulation due to fire risk. Always use protective downlight covers and lay high-load cables over the top of the full insulation depth. Finally, ventilation is essential. Do not block airflow vents at the eaves; a 50mm air gap between the insulation and the roof is necessary to prevent condensation and damp in your loft.
Introduction: Improving Your Home's Comfort and Efficiency with Loft Insulation
For any homeowner in the UK, managing energy bills and maintaining a warm, comfortable home are constant priorities. One of the single most effective home improvements to achieve both is often found right above your head: in the loft. A poorly insulated home can lose as much as a quarter of its heat through the roof. This escaping warmth not only leads to a colder living space but also represents a significant and continuous financial loss.
Properly insulating your loft is like giving your home a woolly hat; it traps the heat where it belongs, inside your living spaces. The benefits are immediate and tangible: your home heats up more quickly, stays warmer for longer, and your heating system works less hard, leading to lower energy bills and a reduced carbon footprint.
Among the leading names in the UK insulation market is Knauf. This guide provides a detailed look at Knauf's loft insulation products, helping you understand which option is best for your home. It covers the materials they use, the UK regulations you need to meet, and a practical guide to installation, ensuring you can complete the project safely and effectively.
BUY LOFT INSULATION
Getting to Know Knauf: A Leader in UK-Made Insulation
When choosing materials for your home, the manufacturer's expertise and reputation are important. Knauf has a long-established presence in the UK building materials industry, offering a wide portfolio of products for residential and commercial projects.
A key factor that sets Knauf apart is its position as the only UK manufacturer of both glass and rock mineral wool. This dual-material expertise allows the company to provide specialised solutions tailored to specific applications. Rather than promoting a single type of material for all situations, their range is designed to offer the most suitable product for each job. For homeowners, this provides confidence that the recommended solution—in this case, glass mineral wool for cold lofts—is based on sound building science and application-specific performance.
Knauf also places a strong emphasis on sustainability. The company is committed to reducing the embodied carbon of its products and has a long-term goal to fully decarbonise its operations. Their mineral wool products play a major part in improving the operational carbon footprint of buildings across the country. On average, it takes just 95 days for their insulation solutions to save the equivalent carbon that was emitted during their manufacture.
The Science Inside the Roll: Knauf's Materials and Technology
To understand which insulation is best, it helps to know what it is made of and how it works. Knauf's loft rolls are a sophisticated product engineered for thermal performance, safety, and ease of use.
Glass Mineral Wool: Trapping Air to Keep Heat In
The fundamental principle behind mineral wool insulation is simple yet effective: it traps air. The material consists of a matrix of fine, resilient, and inorganic glass fibres. These fibres create millions of tiny air pockets. Since still air is a poor conductor of heat, this structure significantly slows down the transfer of heat from the warm living space below to the cold loft above.
Knauf's glass mineral wool is manufactured using a high percentage of recycled materials, including glass bottles and jars, making it a sustainable choice. Beyond its thermal properties, the material is engineered for durability and safety. It is naturally non-combustible, rot-proof, and non-hygroscopic, meaning it does not readily absorb moisture from the air. It also does not sustain vermin or encourage the growth of fungi, mould, or bacteria, ensuring it will last for the lifetime of the building without deteriorating.
ECOSE® Technology: A Greener, Gentler Insulation Binder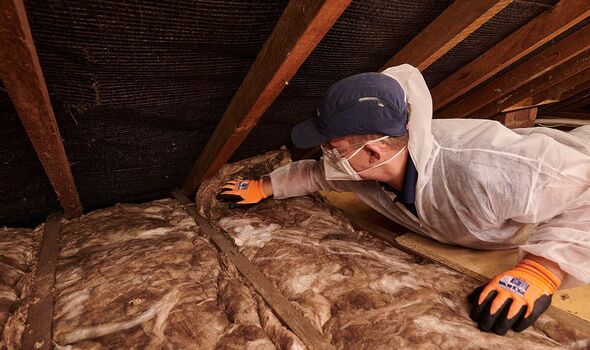
Perhaps the most significant innovation in Knauf's mineral wool is its proprietary ECOSE® Technology. This is the revolutionary binder used to hold the glass fibres together. For decades, the insulation industry used petro-based chemicals like phenol formaldehyde in their binders. ECOSE® Technology replaces these with a bio-based binder derived from rapidly renewable, natural raw materials.
This technology is completely free from added formaldehyde, phenols, and acrylics. The result is an insulation product with several distinct advantages for the homeowner and installer:
-
Softer and Less Irritating: Anyone who has handled old-style fibreglass insulation will be familiar with the itchiness and skin irritation it can cause. Products made with ECOSE® Technology are noticeably softer to the touch and far more pleasant to handle. This innovation directly addresses one of the biggest drawbacks for the DIY market, making the installation process much more comfortable.
-
Less Dust and Odourless: The bio-based binder generates significantly lower levels of dust during cutting and installation. The final product is also odourless, contributing to better indoor air quality both during and after the project is complete.
-
Environmentally Responsible: The manufacturing process for the ECOSE® binder is up to 70% less energy-intensive than for traditional binders. This reduces the product's overall embodied energy.
-
Natural Appearance: Knauf insulation has a distinctive natural brown colour. This is not due to any artificial colours, bleaches, or dyes; it is the natural result of the ECOSE® Technology binder.
This focus on the user experience has made Knauf's products particularly popular for DIY projects, transforming what was once an uncomfortable task into a manageable and accessible home improvement.
Knauf Loft Insulation: Which Roll is Right for Your Loft?
Knauf offers a focused range of loft insulation rolls for the UK residential market. The choice primarily comes down to two main products, distinguished by their thermal performance.
The Main Contenders: Loft Roll 44 and Loft Roll 40
The two primary products you will encounter are Knauf Earthwool Loft Roll 44 and Earthwool Loft Roll 40. The number in the product name refers to its thermal conductivity, a measure of how well a material conducts heat. It is expressed in units of Watts per metre-Kelvin (W/mK). For insulation, a lower number is better, as it indicates that less heat is conducted through the material.
Knauf Loft Roll 44: The Versatile and Cost-Effective Choice
Loft Roll 44 is the most common and versatile option, suitable for the vast majority of loft insulation projects.
-
Thermal Conductivity: It has a thermal conductivity of 0.044W/mK.
-
Availability: It is widely available in a range of thicknesses, typically including 100mm, 150mm, 170mm, and 200mm. This variety makes it easy to achieve the required total depth, whether you are starting from scratch or topping up existing insulation.
-
Formats: Loft Roll 44 often comes in a "combi-cut" format. The roll is partially perforated along its length, allowing it to be easily split into two or three strips to fit standard UK joist spacings (typically 400mm or 600mm centres). This feature minimises cutting and speeds up installation, adding to its DIY-friendly credentials. It can also be used at its full width as a top-up layer over the joists.
For most homeowners, Loft Roll 44 provides an excellent balance of thermal performance, ease of installation, and value for money.
Knauf Loft Roll 40: The Higher-Performance Option
For those seeking a slight improvement in thermal efficiency, Knauf offers Loft Roll 40.
-
Thermal Conductivity: It has a superior thermal conductivity of 0.040W/mK. This means that for the same thickness, it will resist heat flow slightly more effectively than Loft Roll 44.
-
Availability: It is typically available in fewer thickness options and formats than Loft Roll 44, often just as a combi-cut roll.
-
Cost: Due to its higher performance, Loft Roll 40 is generally more expensive than Loft Roll 44.
While Loft Roll 40 offers a performance advantage, the real-world difference in energy savings for a typical loft may be modest. It is an excellent product, but Loft Roll 44 remains the standard choice for its cost-effectiveness and versatility. Loft Roll 40 can also be specified for certain horizontal acoustic applications where a minimum density is required.
Buy Knauf Loft Insulation
Product Comparison Table
The table below summarises the key differences to help you decide.
Feature |
Knauf Loft Roll 44 |
Knauf Loft Roll 40 |
| Thermal Conductivity | 0.044W/mK | 0.040W/mK |
| Performance | Excellent | Higher |
| Primary Use | General purpose, cost-effective loft insulation | Higher performance loft insulation, some acoustic uses |
| Typical Thicknesses | 100, 150, 170, 200mm | 100, 150, 200mm |
| Formats | Combi-cut, Ready-cut, Uncut | Typically Combi-cut only |
| Cost | Standard | Higher |
Meeting UK Building Regulations: Getting the Depth Right
Before starting your project, it is essential to understand the current UK Building Regulations for loft insulation. These standards are in place to ensure homes are energy efficient and safe.
The 270mm Standard Explained 
For new builds and refurbishment projects in the UK, the current recommended minimum depth for glass or mineral wool loft insulation is 270mm. This standard is designed to achieve a target U-value (a measure of the rate of heat loss through a building element) of 0.16W/m2K for roofs, as required by Part L of the Building Regulations. In Scotland, an even greater depth of 350mm is sometimes recommended for optimal performance.
This 270mm benchmark is a relatively recent development. Building regulations have become progressively stricter over the decades:
-
In the 1980s, a depth of just 25mm was common.
-
By 1995, the recommendation had increased to 200mm.
-
Since 2003, the 270mm standard has been in place.
This history is important because it means that millions of UK homes, while having some loft insulation, are insulated to a standard that is now considered inadequate. The vast majority of loft insulation projects today are not new installations but "top-ups" to bring older properties up to the modern standard. This market reality has directly shaped the products that manufacturers like Knauf produce. They sell a 100mm roll, which is the typical height of UK ceiling joists, and then 170mm or 200mm rolls designed specifically to be laid over the top. This product combination is perfectly engineered for the most common UK scenario.
How to Calculate the Thickness You Need
To determine what you need, the first step is to measure what you already have. Carefully and safely, use a tape measure to check the depth of any existing insulation between the joists.
-
If you have no insulation: You will need to build up to the full 270mm depth. The standard method is to install a 100mm layer between the joists, followed by a 170mm layer laid across the joists.
-
If you have existing insulation: Subtract its depth from 270mm to find out how much more you need to add. For example, if you have 100mm of insulation already, you need to add a top layer of at least 170mm.
The table below provides a simple guide.
Your Existing Insulation |
Recommended Top-Up Layer |
Total Depth |
| 0mm (no insulation) | 100mm + 170mm | 270mm |
| 100mm | 170mm | 270mm |
| 120mm | 150mm | 270mm |
| 150mm | 120mm (or more) | 270mm+ |
Fire Safety: Understanding the Euroclass A1 Non-Combustible Rating
A critical safety aspect of any building material is its reaction to fire. Knauf's glass mineral wool loft rolls achieve a Euroclass A1 Reaction to Fire classification. This is the highest possible rating, meaning the product is classified as non-combustible.
In practical terms, this means the insulation will not contribute to the development or spread of a fire. Should a fire occur, the insulation will not ignite, produce significant smoke, or release flaming droplets. This provides invaluable peace of mind and is a key requirement for meeting UK fire safety regulations.
A Practical Guide to Installing Knauf Loft Insulation
With the right preparation and attention to safety, installing Knauf loft insulation is a very achievable DIY project.
Step 1: Preparation, Tools, and Safety Gear
Before you start, gather everything you need.
-
Safety First: Even with the softer ECOSE® Technology, it is best practice to wear Personal Protective Equipment (PPE). This includes overalls, gloves, safety glasses or goggles, and a dust mask (FFP1 minimum is recommended).
-
Tools: You will need a tape measure, an insulation cutter or a long-bladed knife (an old bread knife works well), and sturdy crawl boards.
-
Preparation:
-
Completely clear your loft of any stored items to give yourself a clear and safe working space.
-
Ensure the area is well-lit, using a head torch or portable work light.
-
Carefully inspect the ceiling joists for any signs of rot or structural damage. If you find any, do not proceed and consult a professional.
-
Lay your crawl boards across at least three joists. This spreads your weight and provides a safe platform to work from. Never step directly on the plasterboard ceiling between the joists.
-
Look for any gaps where air might be leaking from the rooms below (e.g., around pipes or light fittings) and seal them with a suitable sealant.
-
Step 2: Laying the First Layer Between the Joists 
The first layer of insulation is laid between the ceiling joists.
-
This layer is typically 100mm thick, designed to fill the space up to the top of the joists.
-
Start at the furthest point from the loft hatch and work your way back towards it.
-
If using a combi-cut roll, tear it at the perforations to the correct width for your joist spacing. If not, cut the roll to size. It should fit snugly between the joists without any gaps, but it should not be compressed or squashed into place. Compressing the insulation reduces its effectiveness by removing the trapped air pockets.
-
Continue laying the insulation between all the joists until the entire loft floor is covered.
Step 3: Laying the Top Layer Across the Joists
The second layer brings the total depth up to the 270mm standard.
-
This layer, typically 170mm or 200mm thick, must be laid at a 90-degree angle (crossways) to the first layer.
-
Laying the insulation in this direction covers the wooden joists. Timber is a poorer insulator than mineral wool, and if left exposed, the joists can act as a "thermal bridge," allowing heat to escape. Covering them with the second layer ensures a continuous, unbroken blanket of insulation.
-
As before, start from the furthest point and unroll the insulation. Butt the edges of each new roll snugly against the previous one, ensuring there are no gaps. Do not overlap the rolls or compress them.
Step 4: Safely Navigating Loft Obstacles
Lofts often contain electrical cables, light fittings, and water pipes. It is critically important to handle these correctly to avoid creating a safety hazard.
-
Recessed Downlights: This is the most critical safety issue. Most recessed downlights (especially older halogen ones) generate significant heat and can be a fire risk if smothered with insulation. You must NEVER lay insulation directly over them. Instead, you must fit a non-combustible, fire-retardant downlight cover (sometimes called a "loft cap" or "downlight hood") over each fitting. These covers create a safe air gap around the light, allowing heat to dissipate. The insulation can then be laid continuously over the top of the covers. Some modern, fire-rated LED downlights are specifically designed to be safely covered with insulation (look for an "IC" or Insulation Coverable rating), but you must check the manufacturer's instructions. If in any doubt, always use a protective cover.
-
Electrical Cabling: Standard lighting cables can usually be left in place under the insulation. However, high-load cables, such as those supplying an electric shower or a cooker, need to dissipate heat to operate safely. These cables must be carefully lifted and re-laid on top of the final, full depth of insulation. Covering them creates a serious fire risk. If you are unsure which cables are which, consult a qualified electrician.
-
Water Tanks and Pipework: Your loft will become much colder after it is insulated. To prevent freezing, any cold water tanks and pipes must be insulated with their own dedicated jackets and pipe lagging. However, it is very important that you do not place insulation underneath a cold water tank. The small amount of warmth rising from the house is often what prevents the tank from freezing solid in winter.
Step 5: Insulating and Sealing the Loft Hatch
An uninsulated loft hatch can be a major weak point, creating a cold spot and allowing draughts.
-
Cut a piece of insulation to the size of the hatch. It is often easiest to place this inside a heavy-duty plastic bag and then fix the bag to the top side of the hatch door with staples or adhesive.
-
Apply self-adhesive draught-proofing strips around the frame of the hatch on the ceiling. When the hatch is closed, it will compress against these strips, creating an airtight seal.
The Importance of Ventilation to Prevent Condensation
Installing loft insulation is a two-part job: adding the insulation and ensuring ventilation. Overlooking the latter can lead to serious problems with damp and mould.
Why a Well-Insulated Loft Needs Good Airflow
When you insulate your loft floor, you stop heat from the house from escaping into the roof space. A direct and unavoidable consequence is that the loft itself becomes much colder, with its temperature getting closer to the outside air temperature.
At the same time, everyday life in the house below—cooking, showering, drying clothes, even breathing—produces litres of warm, moisture-laden air. This water vapour naturally rises and will find its way into the loft. When this warm, moist air enters the newly cold loft space and hits a cold surface (like the roof timbers or the underside of the roofing felt), it will cool rapidly, causing the moisture to condense back into liquid water.
If this process is allowed to continue without adequate ventilation to carry the moist air away, it can lead to damp, mould growth on timbers, and eventually, structural rot. Therefore, good ventilation is not an optional extra; it is a necessary counterbalance to the act of insulating.
How to Ensure Your Eaves Vents Remain Unblocked
Most of the ventilation for a cold pitched roof comes from airflow through vents at the eaves (the lowest edge of the roof). It is absolutely critical that these are not blocked.
-
When laying your insulation, you must maintain a continuous 50mm air gap between the top of the insulation and the underside of the roofing membrane or felt.
-
Pushing the insulation tightly into the very edge of the eaves will block the airflow. Instead, gently curve the insulation down to meet the top of the wall insulation, but ensure the air path from any soffit vents remains clear.
-
To make this easier and to guarantee the gap is maintained, you can install eaves vents or rafter trays. These are simple, inexpensive plastic inserts that fit between the rafters and provide a permanent, unblockable channel for air to flow through.
Frequently Asked Questions (FAQs)
Q: How much does Knauf loft insulation cost?
A: Prices vary depending on the retailer, thickness, and specific product (Loft Roll 44 or 40). As a rough guide, you can expect to pay between £2.00 and £3.00 per square metre for a 100mm roll of Loft Roll 44, and between £4.00 and £5.00 per square metre for a 200mm roll. It is always worth comparing prices from different suppliers.
Q: Where can I buy Knauf loft insulation in the UK?
A: Knauf loft insulation is widely available across the UK. You can find it in major DIY chains such as B&Q (where it may be branded as 'Eko Roll') and Wickes (branded as 'Space Loft Roll'), as well as at builders' merchants like Travis Perkins and numerous online specialist insulation suppliers.
Q: Can I put too much insulation in my loft?
A: From a thermal perspective, the benefits of adding more insulation show diminishing returns beyond about 300-400mm. The main danger of adding "too much" is not thermal but practical: installing it in a way that blocks essential ventilation at the eaves. As long as you maintain the required 50mm air gap for ventilation, adding extra thickness (for example, to 300mm or 350mm) is not harmful and will provide a marginal improvement in performance.
Q: How long does Knauf mineral wool insulation last?
A: When installed correctly in a dry, undisturbed environment, Knauf glass mineral wool insulation is designed to last for the lifetime of the building. It is a highly durable material that does not rot, settle, or degrade over time, meaning it will maintain its thermal performance indefinitely.
Q: Is Knauf Earthwool insulation good for soundproofing?
A: Yes, glass mineral wool has excellent acoustic properties. Its fibrous structure is very effective at absorbing sound waves and reducing sound transmission. While the primary purpose of loft insulation is thermal, it provides a significant secondary benefit of reducing noise from outside, such as rain or traffic. For applications where soundproofing is the main goal (such as in internal walls or floors), Knauf produces specialised 'Acoustic Roll' products with optimised density for sound absorption.
Legal Disclaimer
The information provided in this article is for general informational purposes only and is intended to provide helpful advice. It does not constitute legal, professional, or technical advice and should not be relied upon as a definitive statement of law or UK Building Regulations, which are subject to change.
All building work should be carried out in accordance with current regulations and best practices. Before undertaking any work, you should consult with suitably qualified professionals, such as a certified electrician for any electrical work or a structural engineer if you have concerns about the integrity of your loft structure. Always refer to the manufacturer's specific product datasheets and installation guides for the most current and detailed instructions.
We disclaim all liability in respect to actions taken or not taken based on any or all the contents of this article to the fullest extent permitted by law. You should not act or refrain from acting upon this information without seeking professional counsel.

Samuel Hitch
Managing Director
Buy Insulation Online.
Leave A Reply
Your feedback is greatly appreciated, please comment on our content below. Your email address will not be published. Required fields are marked *